[NOTE: Here is a weaving glossary to help decode the terminology below.]
My beautiful and talented wife is a weaver and has been weaving for several years now. She asked me if I would make her a Tapestry Loom for some rug weaving projects she wanted to do. My research into plans for such a loom led me to the wonderful book “Loom Construction” by Jeri Hjert and Paul Von Rosenstiel which is out of print but available from used book dealers. The book has basic plans for most types of looms as well as for many of the ancillary weaving tools.
As usual, I didn’t follow the design exactly since the customer wanted a larger loom and one with more than one heddle rod. I didn’t like the warp tensioning system from the design in the book either since it relied on nuts, washers, and a threaded rod and I wanted something less cumbersome. I designed a system that is similar to some production looms from Schacht but instead of just using a captive nut I used a threaded insert that essentially put metal threads inside the tensioning beam of the loom.


I decided to make the loom out of maple and walnut so that there would be interesting contrast between the parts. The main frame members and the dowels would be maple and the stand, heddle support, and the guides for the tensioning screws would be walnut. The guides for the tensioning screws were made with 1/2” penetrating dowel tenons and add two nice dots of walnut to the outside. I attached the heddle support with a half lap joint so that it appears to wrap around the frame.
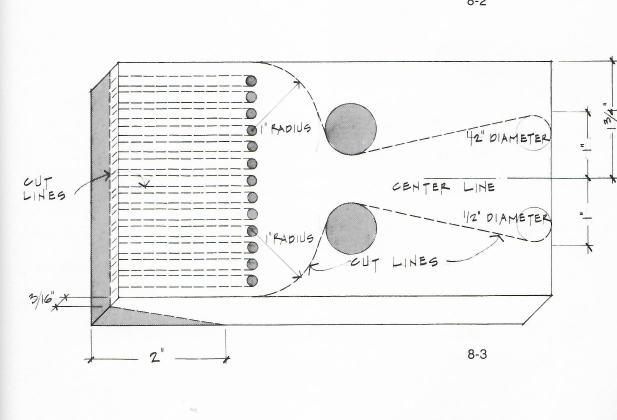
There were a couple of tricky work holding issues in the construction process. In the case of the moving tensioning beam I had to drill through holes for the threaded inserts exactly at the same offset and in the same plane through a 1” maple dowel ( By the way https://wood-dowel.com/ makes the most beautiful, exactly on size, true, round, taper free, defect free dowels I have ever seen. I didn’t sand them at all because they came with such a smooth finished surface) and then I had to mill two flats on each end of the same dowel also in the same plane leaving a 1/2” tab to slide in the slot in the loom. I made four 2” square collar blocks out of 3/4” material with a 1” hole precisely in the middle. I was then able to use one block as a spacer to position the hole and another one to then drill the hole through. After drilling the first hole I could use a bolt in the first hole through the block and the dowel to keep the dowel in the same orientation while drilling the second hole on the other end. The four blocks on the same dowel with bolts maintaining the position of the dowel allowed me to use the table saw to cut the flats accurately on both ends like cutting a tenon on a rectangular piece of wood.
The second problem was the warping bar which is a 1/2” dowel that is used to connect the two ends of the warp into a loop around the loom. It needed a hole drilled in each end to receive pins through the sides of the loom to anchor it in place during initial warping of the loom. My drill press is a bench top model and the dowel was 24” long so it wouldn’t fit. I was able to overcome this by unfastening the head of my drill press and rotating it 90 degrees so that the quill was now over the edge of the bench. I then turned the drill press table as well so I could clamp the dowel to the side of the table and position the dowel for drilling.
I also improvised the loom stand based on similar stands I’d seen on production looms. I made it out of walnut which I resawed to approximately 3/8” x 1 1/2” and then drilled fixed positioning holes for the different loom angles. I used some knob bolts that I have used on a lot of other projects which are M6 metric bolts and I got some M6 metric wing nuts to have a lower profile, no tools, tightening solution.
I sanded all the loom parts except the dowels to 320 grit, glued everything up, and then I applied paste wax to everything. I have found that this finish is excellent for loom tools and it gives a renewable slightly slippery finish to them.
I was concerned that my changes to the design of the loom would introduce functional problems because I’m not an experienced loom designer and I don’t have deep knowledge of what dimensions are important on looms. However, either through luck or intuition the finished loom works great and everything operates exactly as it should. My wife is very happy with it and is currently learning how best to use it.
P.S. A couple of days later I made a Tapestry Comb which is used by the weaver to press down the weft tightly each time they cycle back and forth. I glued up some maple scraps to make the 4” x 6 1/2” x 1” blank.