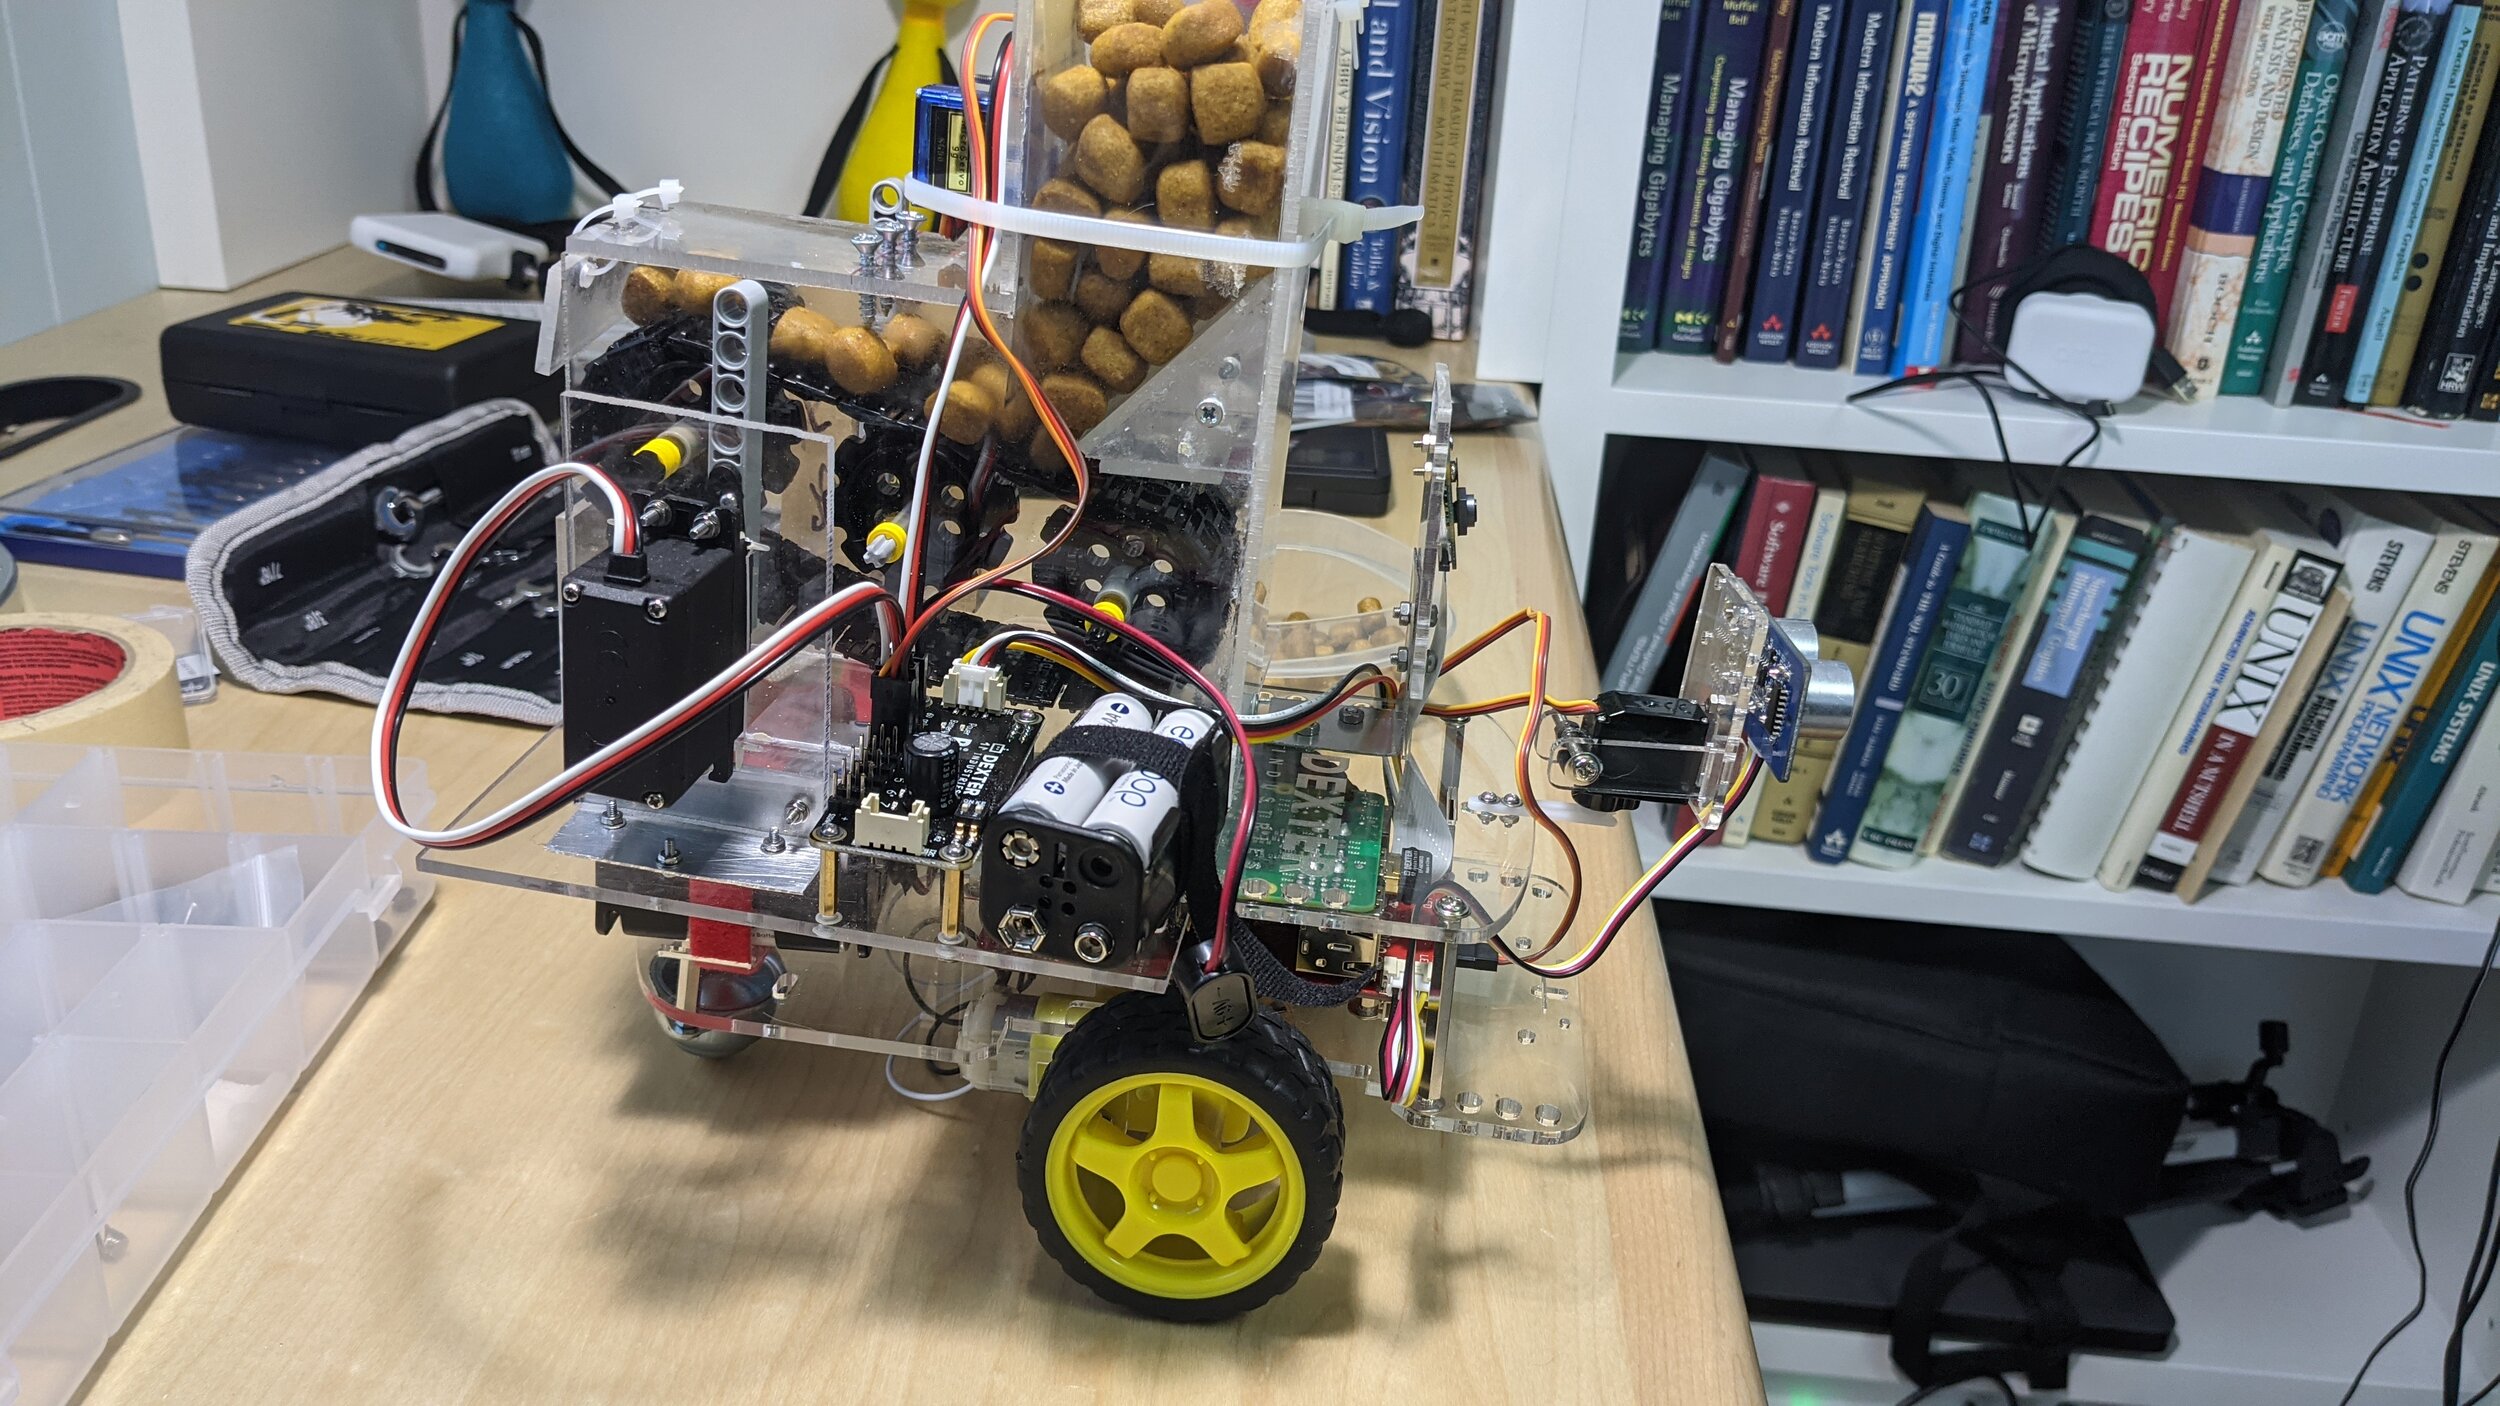
Robot Project: Acrylic treat dispenser

Over the holidays, after evaluating alternatives for cutting the acrylic and aluminum, I got a bench top band saw.

processed_PXL_20201230_204526609.jpg

It has allowed me to make all the parts for the feeder quickly and reasonably straight. I even figured out how to make the treat ramp inside to keep them from getting stuck. I used CA glue to bond everything. That was a little learning curve. My new clamping surface plus some masking tape to avoid gluing the parts to the bench worked great. So, here is the assembled unit:

processed_PXL_20210101_210739393.jpg
processed_PXL_20210101_210757998.jpg

I'm very happy with how it came out. Next is installing the servos and getting it running under power. The placement is going to be tricky.

Robot Project: Audio In/Out, Cat Treat Feeder, Refining the Patrol code

Whenever we’re away for a long time we worry about our cats. There are people who come in to feed them, play with them, and change the cat box, but still we worry. Over the years I’ve developed more and more technological solutions to allow us to check in on them remotely. Now, before we go I set up multiple wifi cameras around the house, each of which is in a likely cat activity space. I can reposition the cameras remotely and they capture based on motion and save up a nice movie of all the activity broken down by hour. They have infrared cameras and so we get twenty four hour coverage. This works pretty well and reduce worry a lot.

There was only one gap in this system, sometimes the cats decide to be completely outside of the view of all of the cameras for many hours. Being an engineer I felt compelled to try and build a solution to fill this gap. I decided that I would build a robot rover that could do the following:

  1. Autonomously roam one or more rooms of the house

  2. Take pictures during it’s patrol and upload them

  3. Record sounds

  4. Play our voices calling for the cats and offering treats

  5. Dispense treats

  6. Allow me to take over and control it’s functions manually over the internet

The theory would be that while a robot would likely make the cats wary, something that sounded like us and dispensed tasty treats would make them get over that and come close to be seen on camera somewhat on demand.

Now that I have the robot assembled and I’ve figured out how to program it, I’ve been working on the patrol code. It is still a work in progress but I’ve managed to get ten probes into a room and not get stuck, I have some ideas on how to get to the next level. Along the way I’ve discovered some interesting edge conditions in the python api code, for example in some locations where they convert from degrees to a number of intervals from the wheel sensor they use integer math. Not in general a problem except when the division comes back as zero in which case the onboard controller takes that as meaning “turn on the motors until you’re told to stop” instead of “stop after some number of wheel sensor signals" So, every so often everything would be going well and then the robot would need to turn a small amount and it would just start spinning in place until it hit the code to go forward which at that point was in a random direction. There was a similar issue with the code to go forward a certain number of centimeters resulting in running right into whatever wall was in front of it.

I’ve got all of the safeguards in my code now to prevent those conditions now, and it has been interesting debugging both in the code and physical world. One of the mechanical things that I ended up having to fix was that I had originally mounted the servo on the front and the ultrasound sensor on the lower deck of the robot ( they didn’t say you shouldn’t and it was out of the way of the camera .) Turns out, that you don’t get full range of motion of the sensor on the servo because the circuit board hits the upper deck. More importantly for something that rolls around the floor it was easy for the low mounted sensor to miss things that would interfere with the top half of the robot. So, I moved it up to the upper deck. I just pivot it out of the frame when I use the camera.

I also learned that you shouldn’t operate the motors and take a picture at the same time, the ribbon cable ( not shielded ) for the camera runs right past the power circuit for the motors. There is a lot of RFI when they’re running and so you get some pretty funky images as a result.

Robot showing amplified speaker, microphone, and new placement of the ultrasonic sensor

Robot showing amplified speaker, microphone, and new placement of the ultrasonic sensor

I got a very cheap USB microphone dongle to use for audio input… bad idea… the gain on the device was terrible, it worked but the audio was barely audible over the noise. The noise was because all of it’s circuits were yes, you guessed it, right near the motor controller board. I ended up using a nice USB microphone via a USB cable clipped to the side of the robot, that worked like a champ and had enough gain to pick up a cat vocalizing.

I also got a tiny rechargeable amplified speaker to plug into the Raspberry Pi’s headphone jack and that worked fine. I got a 90 degree adapter to keep the wire away from the wheels and mounted it to the back with some double stick tape. Using the pygame module it is easy to play any audio file so we should be able to record ourselves calling to the cats and use that.

Design for cat treat feeder…

Design for cat treat feeder…

The final item is the treat dispenser, this is an entire project in itself. I have a design that I’m working on and I’ve created a prototype of the dispenser mechanism. I have been using components from the Lego Technic collection of parts. The great thing is that they have all kinds of shafts, bearings, gears, wheels, beams, etc… that are all compatible with each other. I’m not qualified to machine anything or even do a competent job designing something to be machined. So, these are a godsend and have allowed me to build the core mechanism of the treat dispenser and get it working. The power for the treat dispenser will come from two additional servos one on each side which will push a peg on a drive wheel, they are set 180 degrees apart. (see video for demonstration in the prototype) Fortunately the folks who make the robot provide a kit with an add on servo controller board that can control multiple servos and it comes with a couple of big servos that should work. It also has it’s own batteries and so it won’t be dependent on the robot’s power.

You can see the up and down action of the servo being translated to rotation to drive the belt.

I’m going to make the case for the treat dispenser out of 1/8” acrylic sheet and I’m going to have to cut these parts a lot more cleanly that the last one because I intend to glue them together. My Dremel has a straight cutting bit and a guide collar and I think that would work with the panel clamped firmly to a sacrificial piece of wood and pressing the Dremel against a guide fence. I’m going to be experimenting soon.

That’s where I’m at for the moment.


Robot Project: Adding pi camera and making a mounting bracket

I’ve started hacking away on a prototype program to have the robot drive around the room and investigate the objects it finds with the ultrasound sensor. Part of that was to take a picture, so I needed to get a camera. Raspberry Pi makes a nice add on camera which just comes with a ribbon cable and the camera card. You can just let the ribbon cable anchor the camera to the upper deck of the GoPiGo robot, but it seemed to be too low so that you’d always take pictures of the ultrasound sensor and also not well anchored so when the robot drove around it would flop back and forth. So I needed to fabricate a bracket.

I decided to make it in two parts, a lower right angle made out of .032” aluminum and an upper mounting plate made of the same 1/8” acrylic sheet that the rest of the body parts are made of. I made the cuts in both the acrylic and the aluminum using my Dremel tool and a cutting disk. It worked pretty well just needing to take my time and not heat the acrylic up too much. The only downside is that there isn’t a way to use a guide ( or shall I say I haven’t figured that out yet ) so the cut edges are a bit erratic. The resulting bracket is charmingly imperfect, but completely functional. I secured it to the upper deck with 8x3mm screws, nuts and a compression washer, the mounting plate is attached to the aluminum angle in a similar manner. I almost had an issue because unlike everything else on the GoPiGo the camera board has 2mm holes. Fortunately I had a couple of 8x2mm screws and nuts and I was able to use them to attach the board to the mounting plate. Because of the inaccuracies of my fabrication I had resigned myself to crooked pictures, but due to a happy accident, my inaccuracies canceled out and the camera ends up quite level.

CameraMount.jpg

Now back to debugging my patrol code and adding in the image captures.

Robot Project: Assembly and programming

Back in July of 2016 I guess I thought I’d have some time on my hands to play around with robots… that didn’t happen… but I did buy a GoPiGo kit from Dexter Industries along with some accessories. It has been in my office drawer for four years until this week when I got it out and put it together. It is a nice kit and targets kids 10 years and older and is really quick and easy to assemble. I would say that the youtube videos are the documents of record on how to assemble and get started with the GoPiGo. The robot is a simple rover powered by a Raspberry Pi and a Debian Linux distribution called Raspbian for Robots. It also has servos, cameras, and ultrasonic sensors that you can add on. There is a simple python api for programming the robot and interacting with the servos and sensors.

The version that I have is the GoPiGo 2 and the current one is GoPiGo 3, they have an archive of all of the software and documentation for old versions and the YouTube videos for the old ones are also still there. I got it assembled with only one mishap where I cracked a small Plexiglas part by over-tightening a fastener, I was able to mend it and continue. The software setup was equally easy, just plugged in an Ethernet cable, pointed a browser at it and they have a vnc based desktop where you can configure WiFi. Once it is on the wifi network you unplug the cable and you can just log on to the robot where ever it is via WiFi.

I created a github project for my programs and using git I can just pull them onto the robot. That way I can code on my desktop and just move things over via git. You can power the robot for programming purposes using a USB power adapter so that you don’t deplete the batteries while you’re debugging. I’ve successfully shipped over a couple of test programs and tested moving the robot and also manipulating the servo and reading the ultrasonic sensor. Now I’ve just got to think about what my first substantial robot project is going to be.

IMG_4712.JPG
IMG_4713.JPG
IMG_4714.JPG


terminal-dashboard v0.0.5

I’ve made a lot of progress on the testing for the dashboard tool, I’m at about 80% coverage across the whole codebase. It was interesting getting the fixtures written for each of the different data sources so that they could be tested. I also added some features for testing and also some refactoring to enable testing. I moved most of the code for loading and processing the configuration file out of the main script and into a separate module. This allows those functions to be tested in isolation but also they now represent a usable API in their own right. I didn’t want to include the config code directly in the dashboard module since it is coupled to all of the different types of data sources and their dependencies. This way the dashboard code could be used with totally alternative graph objects or data table objects without any direct coupling to those specific implementations or their dependencies.

I used a model of snapshot comparison to verify the graphics rendering code, this involved creating static data sets and controlling the screen size carefully. It also requires some honesty on the part of the tester to carefully verify the renderings and not accept bugs. I have at least one bug in my example dashboard that I so-far haven’t been able to reproduce in the test automation… but it is on my list to track down.

My plan is to finish getting through the CLI and config testing and then on to the next round of features and enhancements.

Software Project: terminal-dashboard v0.0.1

Back in 2017 when I was working at Elastic and leading the Kibana team ( Kibana if you don’t know is a web based tool for querying, analyzing, and visualizing data that is stored in elasticsearch, which has as one of it’s core use cases rendering dashboards for collections of operational monitoring data in data centers ) and being the contrarian that I am, I thought: “What about the green screen folks who manage lots of systems, only use the command line and a terminal, and who would balk at installing a whole server just to run Kibana? Why can’t we have a dashboard tool that presents graphs of the same data in a terminal window?” Probably an insane idea, but you’re reading the words of someone who wrote graphical games for the TRS-80 Model I so it didn’t seem insane to me… So I started out using curses and block graphic characters to create a drawing package with all the essential graphics primitives. Then I built a data table abstraction to allow flexible access to the data without too much coupling… Then things got really busy at work and my attention span disappeared and I put the project aside.

Three intense years later I’m retired and I’m spending some time converting old projects to Python 3, moving old svn repos to git, and I come across this project again… I have the time now so I decided to push the project forward a bit more. I’ve managed to implement some basic chart types, line, bar, pie and table. I’ve created data sources for reading the syslog and summarizing it and for getting the machine’s process, memory, and disk statistics. I’ve written a driver script that loads a JSON configuration file that sets up the pages, panels and graphs of the dashboard and displays them and allows interaction as well as an unattended cycling kiosk mode. At this point I think this thing could actually be useful. Here’s a short demo of it running:

There’s a few things that I want to add in the near future:

  • Ability to monitor other systems via ssh

  • A flexible data source for querying elasticsearch so folks could use it with an existing Elastic Stack deployment

  • Management of credentials using the system keyring so it can auto connect and self deploy through ssh to multiple systems

The sub-modules I think might be useful for other applications since they are pretty general and not coupled to this particular application.

It’ll be fun to show the next steps…

Software Project: slides-sound v1.0.0 shipped...

So, the final project that I’m going to convert to Python 3 has shipped. I restructured it to a standard python project, converted it to Python 3, fixed a bunch of bugs and things that just weren’t good… added packaging and did some manual testing. It is here on github (https://github.com/jpfxgood/slides-sound) and from pypi by doing python3 -m pip install slides-sound.

This is really an experiment if anything and I intend to keep iterating on it, so possibly massive changes will come. I’m not doing formal tests for this one because honestly it doesn’t warrant it yet. If it ever stabilizes then I’ll dig in and do that.

There were more changes than I expected because some of the packages I used had changed in unexpected ways, some of the way I was doing things was completely inefficient, and stuff was broken because it was just hacked together ;-). So now it is a lot cleaner and less hacked…

You can check out the readme and the doc for further information…

This is the end of the Python 2 to Python 3 saga for now, there are a few other things that I haven’t published that I may convert in the future, but these are the ones I use most often and they’re published.

Here’s a parting video generated using the slides and music scripts:

Pictures from my several years commuting to Berlin.


Software Project: ped-editor v1.2.0 shipped!

A new feature release of the editor. The feature is that either when you pipe content into the editor like “find ~ | ped” or you use the F10 shell command dialog the buffer will update in the background for as long as the command produces output. You can press Ctrl-F in that buffer and toggle following, i.e. the screen will automatically show you the end of the stream and the latest content. If you want to follow a file on disk you can use “tail -f filename.log” as the command and the resulting buffer can be used to view this information. All of the regular read only buffer commands are available, copying content, searching with regular expressions, etc…

There are new tests since the underlying StreamEditor class is used in the StreamSelect component and so the existing tests caught a lot of side-effects that I had to clean up as I did this. I have to say having sensitive tests has made this whole thing a lot safer, I probably would have pushed my first cut on this in the past and then discovered the problems later. Now, it all works and is covered with regression tests.

I’ve also updated the wiki usage documentation with up to date screen shots and more information about how the editor works.

Software Project: bkp-sync v1.0.0 shipped!

The suite of backup, restore and sync tools that I use to back up and sync all of our home systems is now officially a v1.0.0. The repository is here https://github.com/jpfxgood/bkp and the package is in pypy as bkp-sync so you can just do python3 -m pip install bkp-sync. The scripts will get installed on your ~/.local/bin…

The transition from the original code base to this one was a massive change, I converted to Python 3, restructured the project to be a standard Python project format, wrote pytest automation for all of the modules and the command line scripts.

I just converted my main system over to using the packaged version in “production.”

In the process of doing this I cleaned up the code a lot, the original had lots of globals and module level state which made the modules sorta useless as an API. I fixed all that, encapsulating everything into classes so now the modules form a very powerful API for moving files between file systems, sftp sites, and Amazon s3. In the process the command line tools gained new capabilities that they didn’t have before, “sync” for example was never intended to work with s3 and now it does, so you could set up a sync between a local folder or folders and an s3 bucket and changes would just get automatically pushed and pulled.

The backup api creates versioned sets of changed files which is very cool as a concept to build other things besides backup software. The controls over what gets backed up are very flexible and powerful.

The whole process went faster start to finish than the editor project partly because it was a smaller codebase with less “features” but also because I had already climbed the learning curve of the tools and such.

So, I think I’ll get https://github.com/jpfxgood/slides-sound converted to Python 3 but without the rigorous testing since I really don’t use those tools for anything but experimenting. The https://github.com/jpfxgood/my_radio project is probably dead, it wouldn’t be worth converting it to Python 3 so I’ll just leave that there as an archive.

Software Project: ped v1.1.2, pypi and packaging

I finally built a standard python package for ped and released it to pypi which means it can be installed now by doing: pip install ped-editor ( just make sure that ~/.local/bin is on your path ). It is a sign of my brain recovering from years of being a manager ( and by definition very distracted all the time ) that I figured out the packaging stuff in a few hours. I have to say I looked at it many times over the years and I just didn’t get it so I put it off.

I’ve even started following a software development process, running and adding tests, building documentation, pushing releases. I’ve been the one making other folks do those things, but I haven’t had to do them myself for a while. There was considerable grinding and screeching as those old wheels started to turn again in my head.

Now that I have this project in shape I’m going to shift my attention to the backup software ( https://github.com/jpfxgood/bkp ) and do all these things there. Hopefully it’ll go a bit quicker since it won’t include the learning/relearning that I did on this project.

Also, I need to rehab a bike for my wife, but that is a different thread…

pedscreeen.png

Software Project: ped the editor, v1.0.0

After all the work getting the editor ( https://github.com/jpfxgood/ped ) to Python 3 and getting the test coverage to 78% and fixing a lot of bugs, I also wanted to do some improvements. I worked hard on getting the optimal redraw to work and the terminal cursor was still being a problem so I turned it off and now render my own cursor. I also had to redo a lot of the code that managed multiple views so that they would render efficiently and also keep their cursor positions when you changed frames or current files and updates in other windows are properly reflected in all the windows. I also made it easier to see which frame is current when there are multiple frames and cleaned up a bunch of over refreshing in the dialog code as well.

I made it so that editing a new file doesn’t create the file until you save it and also the editor now warns you if the file you are editing has been modified on disk.

I optimized the code for recoloring the current file and now it runs very fast reducing or eliminating any flashes when it has to catch up.

So, given all the improvements and the testing I decided to mark that moment with a v1.0.0 release. I’ll try to do patch releases relatively frequently as I find and fix other things ( two seconds after the v1.0.0 release I found several things and fixed them…)

It’s been a lot of fun getting this code cleaned up and improving the testing, I’ve spend hours at a time in a kind of flow state just coding and debugging. I even forgot to get lunch a few times, which I never do…

Software Project Python 2to3 continued... 66% coverage, >75% in the core editor...

This has been a very healthy process for the editor code, as I’ve been writing tests I’ve also rewritten code to make it much better than when I originally hacked it up. That is the thing when you’re in a hurry, often you’ll stay on a bad implementation track because you’re “close” to getting it to work. It is nice to go back and have the time and focus to reconsider a bunch of things. The tests themselves are interesting, for example I had to figure out how to resize the terminal window to test the code that resizes all the editor panes in response. That code always annoyed me and had a lot of bugs, now it is rewritten and it is very stable.

I’ve been using the python coverage tool to measure the coverage and it has also helped point out a few modules that aren’t used anymore so I’ve been improving coverage through deletion as well. I’m going to try and get the overall coverage over 70% and I need to make another pass over the minimal redraw logic as well… It still has some odd behaviors…

Then on to the backup and sync scripts that I wrote, it’s going to be interesting to create valid tests for those…

Software Project Python 2to3 continued... 47% coverage, 70% on the core editor...

Whoo… a lot of bug fixing, a lot of test cases, and getting all the test cases to work in both non-wrapping and line-wrapped mode… The cool part is that now when I’ve made some minor improvements, the tests are showing me areas that are impacted by the changes and catching side effects. I should have done this a long time ago. I’m done with the core editor module and I’m going to do the module that manages windows and switches between files and such at a high level next. I’m hoping to get the overall coverage over 60% with this one… we’ll see…

Here’s the latest video capture with the coverage report at the end:

This gets me up to about 47% coverage but 70% coverage of the core editor.


Software Project Python 2to3 continued... Wow, such bugs...

The process of converting the editor ( https://github.com/jpfxgood/ped ) to Python3 and writing tests is going well. I am fixing a LOT of minor bugs and edge conditions that don’t really come up a lot in my normal use of the editor but are very evident doing detailed test cases. I came up with some cool ways to test features that are only available interactively by using the keyboard macro feature of the editor to feed the required interaction to the editor main processing loop. It reminds me of testing 1-2-3 for DOS where virtually all of the testing was done with keyboard macros and screen comparisons. It also tests the macro feature, and it already helped me fix a hidden bug in the macro feature where it was accumulating null characters when no key was being pressed. If one left macro record on it would have eventually sucked up all of the heap memory, though I guess it would have taken a while on modern machines. I may have to refactor the main test function since it is getting pretty long, I’ll see where it’s at when I finish.

Oh and running pytest inside VSCode is wonderful for debugging both the code under test and the test automation at the same time.

Here’s the simple launch config that I use:

{
    // Use IntelliSense to learn about possible attributes.    
    // Hover to view descriptions of existing attributes.    
    // For more information, visit: https://go.microsoft.com/fwlink/?linkid=830387
    "version": "0.2.0",
    "configurations": [
        {
            "name": "Python: Current File",
            "type": "python",
            "request": "launch",
            "program": "${file}",
            "console": "externalTerminal"
        },
        {
            "name": "Python: Pytest",
            "type": "python",
            "request": "launch",
            "module": "pytest",
            "console": "externalTerminal"
        }
    ]
}

If you want to watch the tests run I have this handy screen recording:


Software Project Python 2 to 3 continued... so many bugs...

Well, it has been good writing tests for the converted editor code ( wip is here: https://github.com/jpfxgood/ped/tree/master/2to3out ) as it has also shown up a bunch of existing bugs and nits and stuff that was just appearing to work but wasn’t… Plus I got to figure out a nice way to test both the internal editor logic and the rendering at the same time. I’ve been using Microsoft’s VSCode to debug things because it can do it in a detached terminal, very handy for a curses based application like the editor.

I’ve also made some decisions about removing some features that I don’t use anymore ( and I don’t think anyone else would use either, an AIM IM integration, nntp client, svn browser… see… you don’t want those ) and I don’t really want to test them or get them working. So those came out of the code as well, the editor will be much lighter.

pytest is pretty robust I must say, it is handling test code with nested functions without batting an eye, it even shows the nesting in the test failure output… very nice. Anyway onward to hopefully finish the core editor classes in the next couple of days.

Software Project Python 2 to 3 conversion for my scripts...

I’ve got a bunch of python scripts that I have written over the last eleven years or so. I have published some of them on github here: https://github.com/jpfxgood Probably the most sophisticated is the editor ped (python editor) that I wrote originally back in 2009 and have been working on ever since. Over those years I was pretty busy as a professional programmer and managing software engineers in ever larger groups. I snuck in the work on these scripts when I had the time to focus. A couple of things just didn’t get done as part of that, I never wrote proper tests, and I ignored the looming end of life for Python 2 and the migration to Python 3.

Well, now I have the time so I’ve started on both projects. First I brought the github projects up to date, truth be told I use svn locally because it is what I was used to. After this project github will be the canonical version of these scripts. Then I used the 2to3 script to do the rough conversion to Python 3 into a new temporary subdirectory “2to3out”. The script does a decent job, but it was still a surprise that division suddenly works differently… Also some of the code around reading and writing “utf-8” encoded files need to be tweaked. The differences between byte streams and character streams came up in several places. A few miscellaneous changes to the signatures of imported modules and functions had to be corrected. In general the changes beyond what the script converted were small.

The testing was the real problem. As I went through and manually tested each feature of each script I found a number of bugs, most of those bugs were unrelated to the 2to3 conversion, they were simply things I’d never really tested before. So as I got to the point that I was fixing more and more of these I decided that now was the time to bite the bullet and do penance for my past sins and write a regression test suite for these projects.

I liked pytest in the past, it is simple, doesn’t require any intrusive changes, is flexible, and I’ve used it before. So, after a few minutes reviving the brain cells that used to know about pytest I started on a tests folder and a set of test suites for each module in the scripts. I started with the editor first since it is the most complex. I’ll probably do the backup script after that since the fixtures to test it are going to be interesting to implement.

I’ve got a few cases written already and I do thank my past self for refactoring the editor multiple times over the years to make the internals pretty modular and independent. Apparently they screwed with the regular expression module as well as I’m getting Deprecation warnings for many of my uses of it, sigh, I’ll have to go through and clear those up too.

Here’s the test output so far:

It is a meditative process writing tests for eleven year old code, I get to appreciate the good parts of the code and laugh at the crappy parts again.

More updates as it continues…